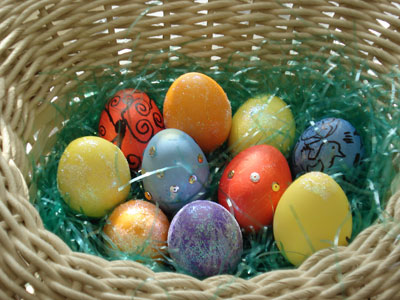
Whether you are trying to rekindle fond childhood memories or lending a helping hand to a young family member, dying eggs is always a fun Easter tradition. Egg decorating has truly become an art of its own, and there are seemingly endless ways to create your very own masterpiece. Described below are two methods – one traditional and one more abstract. Depending on the time and amount of effort you are willing to contribute, try one out and create some egg-cellent art!
This first egg-dying method is not for the faint of heart. Be forewarned that it will take quite a bit of time, but the results are well worth the effort. You will need eggs (not boiled), 100% silk ties, and string. The first step is to cut the silk ties into squares large enough to wrap around each egg. Since these ties are obviously being destroyed, buy some cheap ones from stores like Goodwill (ones with patterns tend to work best). With the ties cut-out, wrap the fabric around the egg with the satin side of the fabric touching the egg. The next step is to use the string to wrap around the fabric-covered egg. This is the most time-consuming part of the process and you must make sure that no part of the fabric is showing (make sure you have a lot of string!). Once the egg is covered, cut the string, leaving a trailing piece. Now it is time to boil the eggs. Put as many of the wrapped eggs as you want in a boiling pot of water and cook for 20 minutes. Drain the water, let the eggs cool for a few minutes, and then unwrap the eggs. If done correctly, the pattern of your tie will be beautifully displayed on your egg!
The second method is a more traditional one, suitable for those with time-constraints. Simply pick up eggs and a dying-kit from your local super market. The standard dying kits have color tablets, usually some decorations, and are very inexpensive. The first step is to boil your eggs – in case of an accident this makes clean-up a lot easier. Next, lay down newspaper or paper towels on your work area. If the dye gets on anything, it will stain! With the dye tablets, the instructions state you can use water or vinegar. Use vinegar for more vibrant colors and water for diluted pastel colors. Use a different container for each colored dye and start dipping your eggs. To get an even and uniform color on your egg, use a utensil (plastic spoons work well) to continuously turn the egg in the colored dye. Once your egg is colored, transfer it to an egg carton or provided stand to dry. The dye takes awhile to dry, so wait a good half hour before continuing decorating. At this point, let your creativity take over! You can use glue to make patterns with glitter or sequences, or just grab a sharpie and draw your own picture. The possibilities are endless.
So if your feeling the holiday spirit, try one of these dying methods and make your own egg art! And the best part is – it is art you can eat!
'Tips for Excellent Eggs' has no comments
Be the first to comment this post!